Understanding Your RV Electrical System: A Beginner-Friendly Guide
Michael Gardner • June 20, 2025
Not All RVs Are Wired the Same
This can be a very broad topic. An electrical system for a 12-foot pod trailer would be very different from the system in a 40-foot class A. Add in that RV manufacturers make many different decisions when building their rigs, there are no hard and fast rules for what electrical components are in a particular RV. If you aren’t the first owner, then what electrical equipment is in your RV may not be original. What I plan to do is explain the parts so you can better understand their function and how they may apply to your RV. You will need to do a bit of research about your RV to better understand what you have.
How do you know what is in your RV? Start with the manual that came with your RV. As useless as most are, it may explain what controls you have – which will give clues as to which components are installed. For example, many inverter/chargers have a monitor and control panel. There are many RV help web sites, Facebook groups etc. where you can ask questions. But when you do, provide YEAR, MAKE, MODEL so people who would be familiar with your RV can answer questions. It is also helpful if you can include a few pictures as well as some basic electrical measurements. Those are going to be the first questions people ask when they try to help, so you might as well get ahead of the game.
Where Your Power Comes From
Let’s start where the power most often comes from: the campground pedestal provides 120 volt Alternating Current which is what North American households use. Most modern campgrounds will have a 50/30/20-amp capable pedestals. There is a 20-amp AC socket, a 30-amp AC socket and a mis-named 50-amp AC socket. There should be a breaker for each of these outlets. The 20 and 30-amp sockets provide a single 120-volt line and ground with circuit breakers set to those current amounts. The 50 amp provides two 50-amp circuits plus ground.
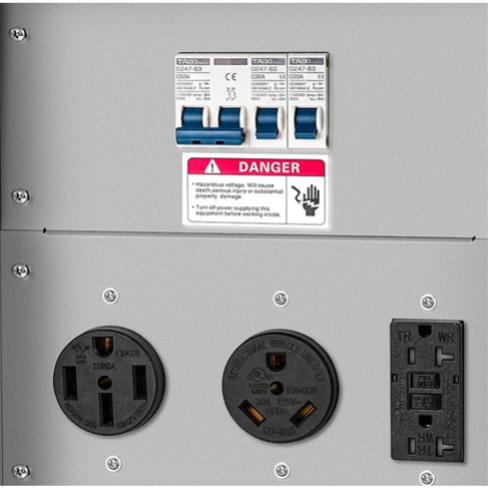
Your RV should come with an appropriate cable to connect power from the pedestal to your RV. There are other items like power line monitors, testers and adapters I’ll cover later.
DC vs. AC: What’s the Difference?

At the most basic level, small trailers have 12-Volt DC (Direct Current) systems. That is, they run off a 12-Volt battery which provides direct current – a steady 12-volt power. Most likely they also have battery charger – which converts 120V AC power (like you get from a campground pedestal) to 12V to charge the battery. While there may be a 120V outlet or 120V appliance, like a microwave, in the trailer that only gets its AC power from the campground pedestal, most everything in the trailer will be designed to use 12 Volts off the battery. From the picture, the AC Breaker panel, the Battery Charger and the DC fuses will usually all be built into a single box. The battery charger is often not visible as it is built into the back of the power distribution/braker/fuse panel.
What Is an Inverter and Do You Need One?
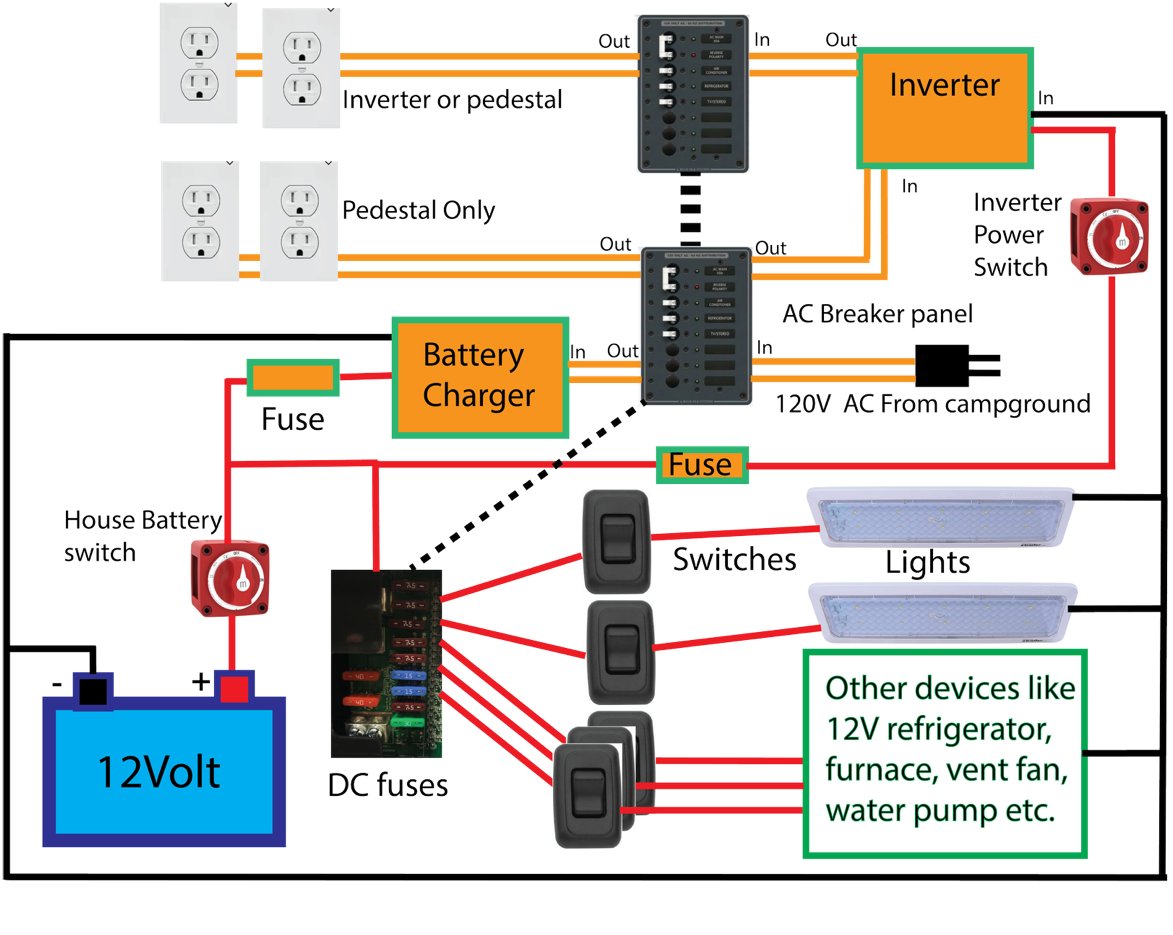
As trailers get larger, they will have more battery and include an Inverter. The inverter uses 12V DC power from the battery and converts it to 120V AC power. An inverter allows you to use some appliances when not plugged into a campground. Inverters however use a LOT of power from the batteries, so their use must be limited and/or sizeable battery bank must be installed. Inverters are also limited in their output capacity. My motorhome came with 2000Watt inverter. Fire up a hair dryer (900W) and the microwave (1600) at the same time and the Inverter pops its circuit breaker or shuts down.
Some outlets or appliances (like Air Conditioners) won’t be connected to most inverters as they simply draw too much power. In this diagram, AC power enters the breaker box, is distributed directly to some AC devices but also feeds out to the inverter. When plugged into a campground pedestal, the inverter simply passes AC power through to a different part of the breaker box to its outlets and appliances. When camp power is not present, the inverter pulls power from batteries and provides 120V AC power to its devices. Most larger trailers, Class C and Class A motorhomes are configured this way, but not all. Also, often the Inverter and the Battery Charger are in the same device.
In larger units many refrigerators are now “residential” meaning they use 120V AC instead of using 12V or propane. There are also some new “inverter design” refrigerators that use 12V DC directly. You will need to know which you have to start diagnosing problems with refrigerators.
Generators: Backup Power on Demand
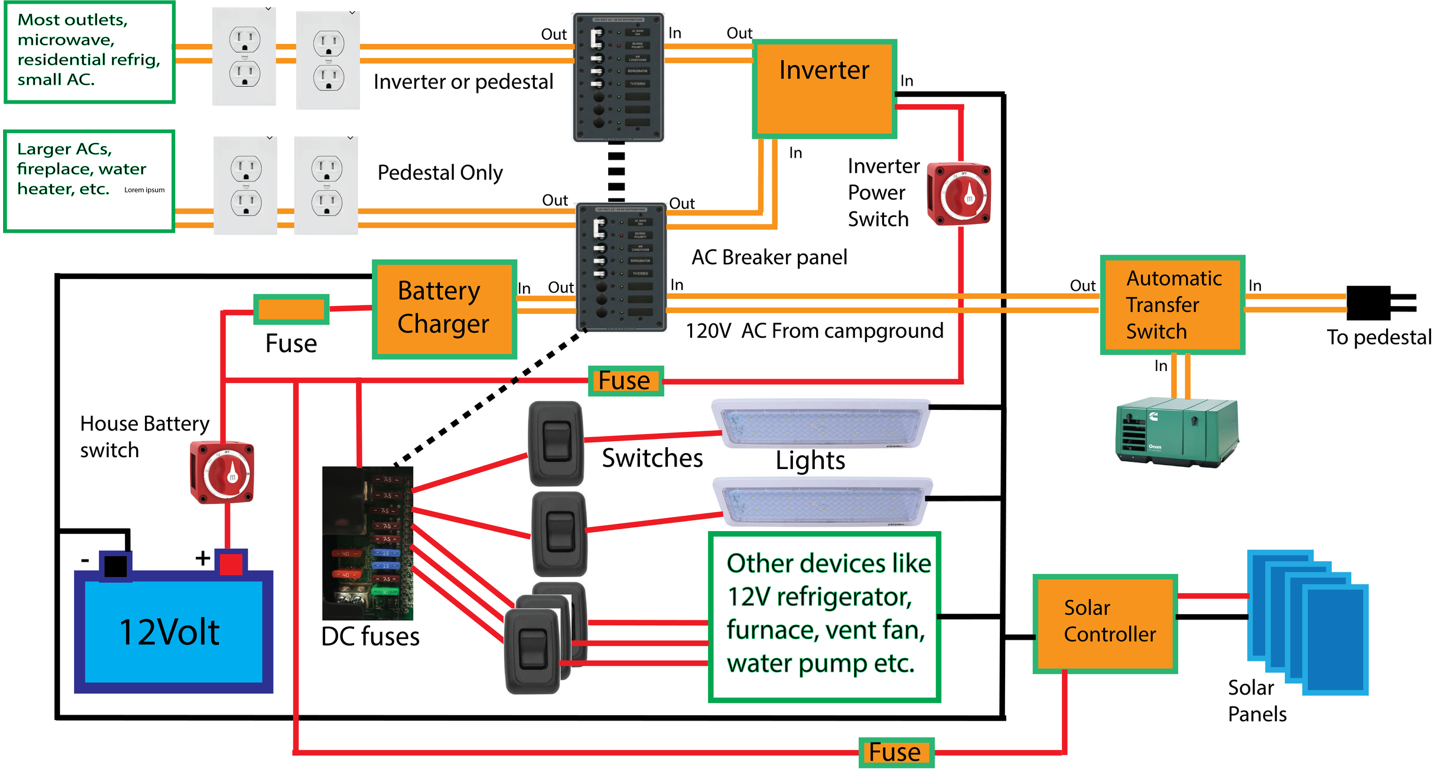
Larger trailers and motorhomes often, but not always, have a generator installed. The generator produces 120V AC power which can power appliances including air conditioners while also powering a battery charger to keep the 12V batteries topped off. Because there are two potential AC power sources (campground and generator) an Automatic Transfer Switch controls whether power comes from the campground or generator (usually auto switching to the generator when it is running). Not shown in this diagram is that the Generator uses the house 12V batteries to start up. Some larger RVs with generators, it can be automatically started when the house batteries get too low.
Understanding Dual Battery Systems
Motorized RVs- vans, class B’s, C’s and A’s have an additional complication that they have two battery systems. One that starts and is charged by the engine (chassis battery) and a second one that is used to power items in the RV (house battery). Sometimes the house battery is charged by the engine when driving via an automatic battery switch that engages when the engine is running. When the engine isn’t running, it turns the switch off to keep the house side of the system from draining down the chassis battery in the event that house battery is accidentally fully drained.
What Solar Adds to the Mix
And if all that wasn’t enough, Solar panels add another source of 12V house battery recharging. Solar panels must be connected through a solar controller to make sure they charge the house batteries correctly.
Welcome to the World of Smart Panels
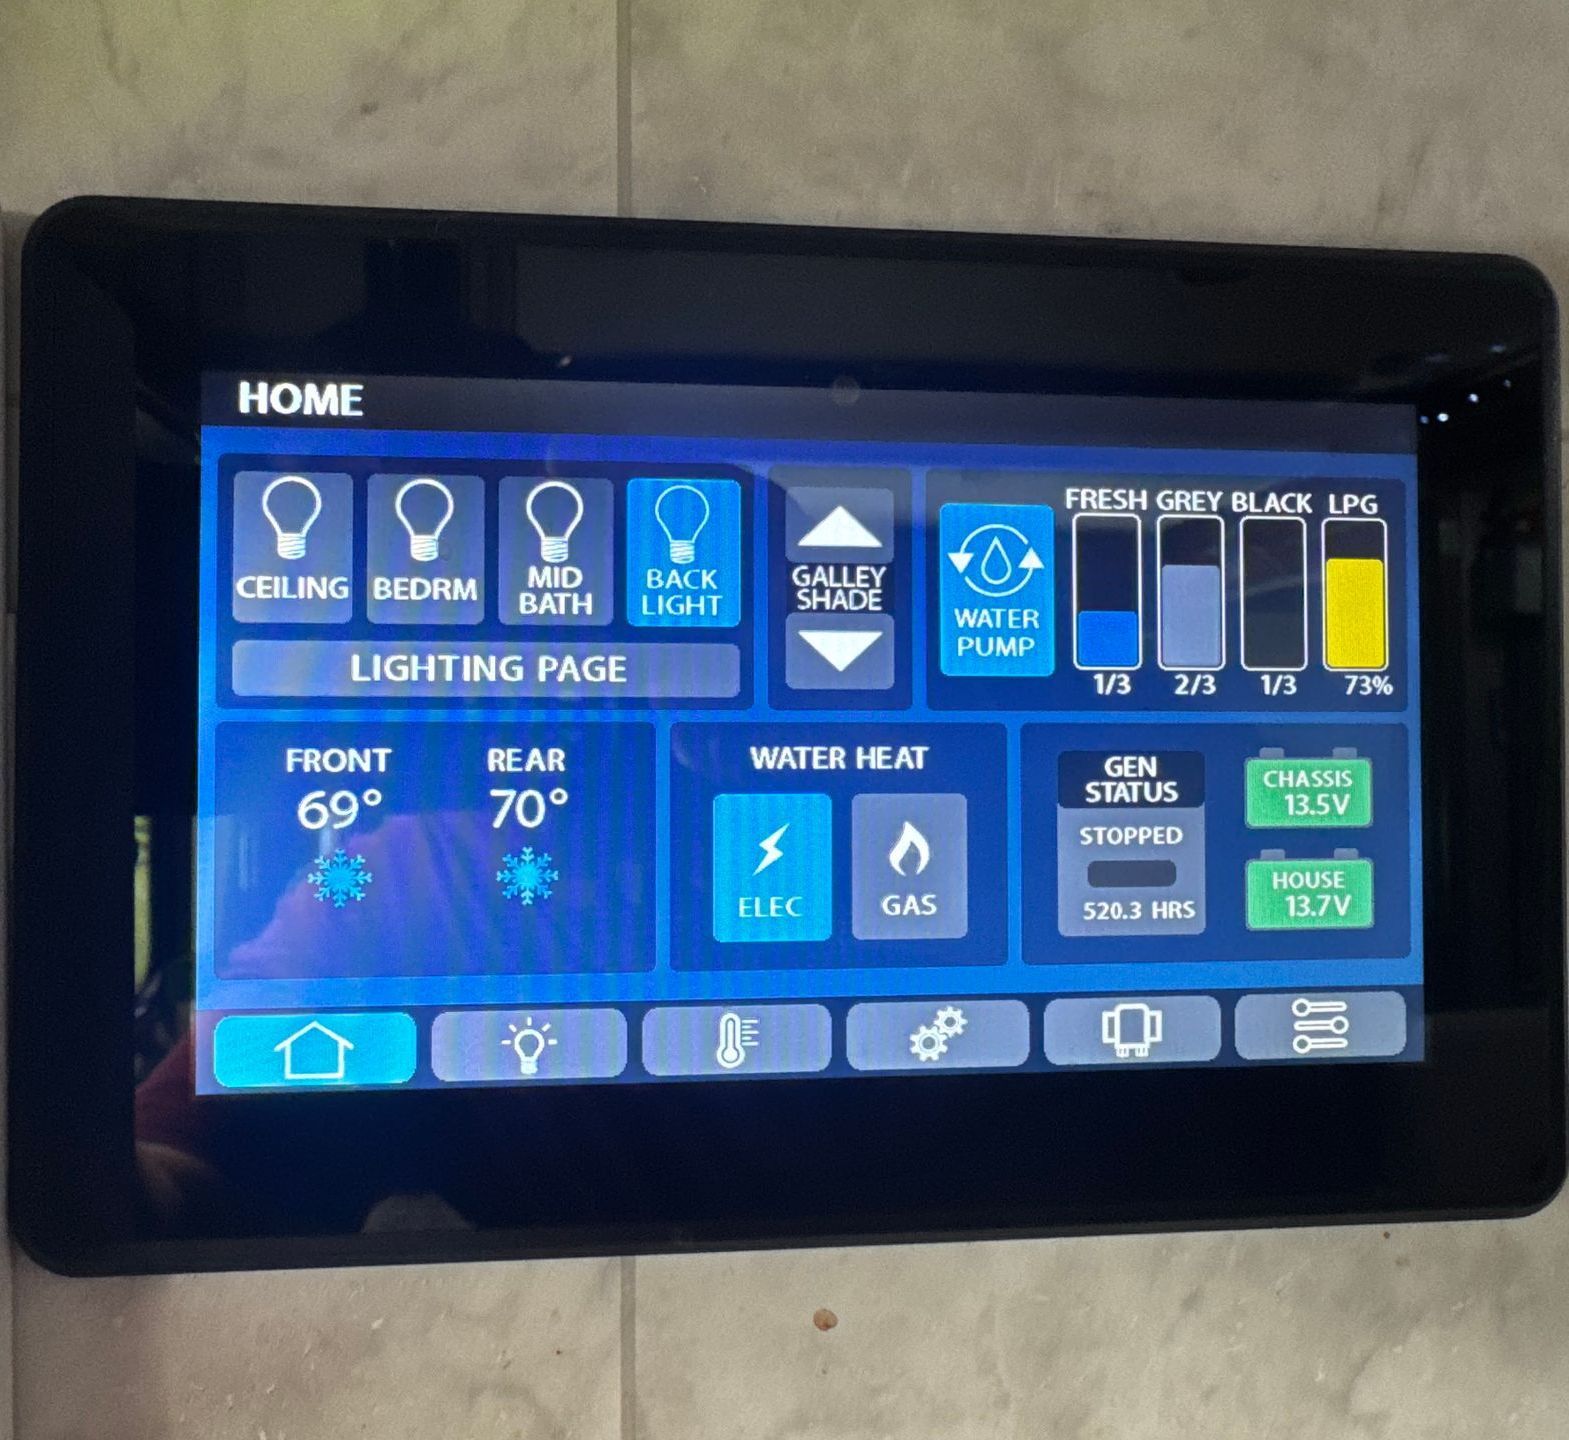
Manufacturers of larger RVs have begun installing “smart distribution panels” that control and limit how AC power is used within the RV. While they provide additional functionality, such as managing 3 air conditioners so they don’t all run at the same time, they also add additional confusion factors when debugging problems. Higher end RV also have multiplexed control systems. They consist of touch or pushbutton panels distributed around the RV, sometimes with a screen that allows you to monitor and control most functions in the RV. These panels and the various switches are connected via special networks. They are too varied and complicated to discuss in depth here. However one of the most common faults I’ve seen is one of the network cables in the back can fall off and disrupt connectivity for one or more panels.
Troubleshooting Power Problems
If you’ve lost power in most of your RV, start with your main AC breakers. Also consider if only some functions do not work. If your lights come on, then the batteries are probably providing 12 volts. If 120-volt appliances don’t work, then check the campground pedestal and verify you have power there. If you have power coming in from the pedestal and your air conditioner works, but not other appliances (that are on the inverter), then an inverter breaker may have popped. Most inverters have a separate breaker on the inverter – a small push button that is almost invisible.
The most common trouble diagnosis has to do with batteries. Have they run down? Are they charging? Is a fuse blown or breaker shut off? Everyone should have a basic volt-ohm meter. Set it to DC volts and place a probe on the plus and minus terminals. Fully charged Lead Acid batteries should be between 12.6 and 12.8 volts (voltage varies quite a bit depending on if is being charged or discharged.) Fully charged Lithium batteries should read 13.3 to 13.4 volts.
Battery Basics Every RVer Should Know
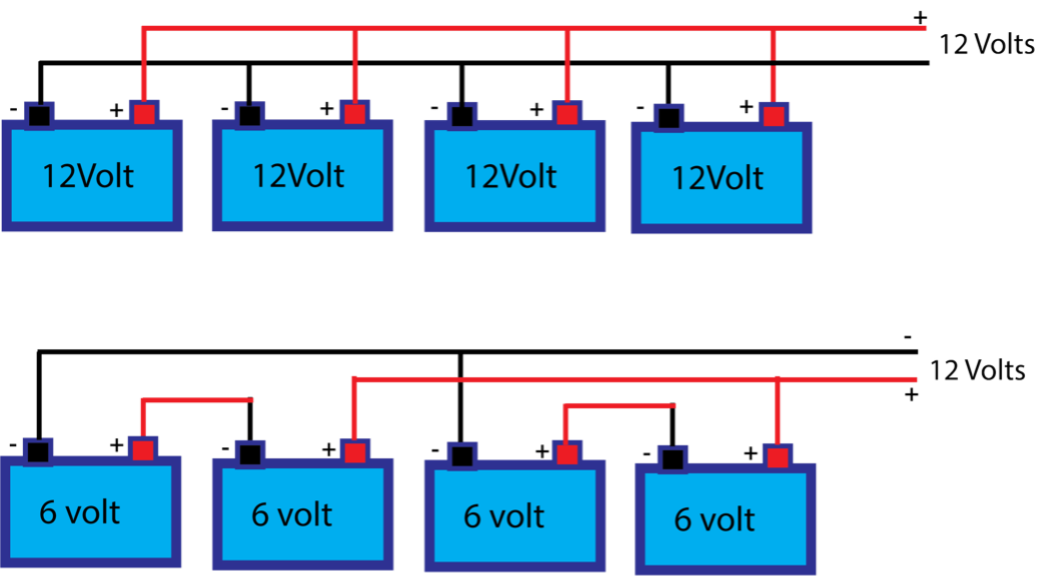
To increase the storage capacity in the RV power storage, multiple batteries are connected in parallel -that is all negative terminals connected to each other and all positive connected together. Some RVs choose to use 6 volt “golf cart” batteries as they are constructed with more robust plates (and thus can be discharged a bit lower without damage). In that case, two six-volt batteries are connected in series (+ to -), then pairs of 6V batteries are connected in parallel for additional capacity.
And then there is the switch from Lead Acid batteries to Lithium-Ion Phosphate chemistry. Aka Lithium batteries. While they are more expensive, they provide much higher capacities with lower weight. However, they require different charging profiles, shouldn’t be directly connected to lead acid batteries, nor should large Lithium battery systems be charged directly from the engine alternator as their low internal resistance can overload the alternator. The complexities go beyond the intent of this article. If you wish to upgrade to lithium, you need to investigate whether your charger has a lithium compatible setting (and solar controller if you have one).
Battery Monitoring: Beyond the Guesswork
How do I know the state of charge of my batteries? With Flooded Lead Acid Batteries (FLA is the most common 12V vehicle battery) one can get an approximate state of charge (SOC) by reading the voltage AT REST. What I mean by at rest is with nothing connected that is either drawing current or charging the battery as both conditions affect the apparent voltage of the battery (at 25C/77F). See chart.
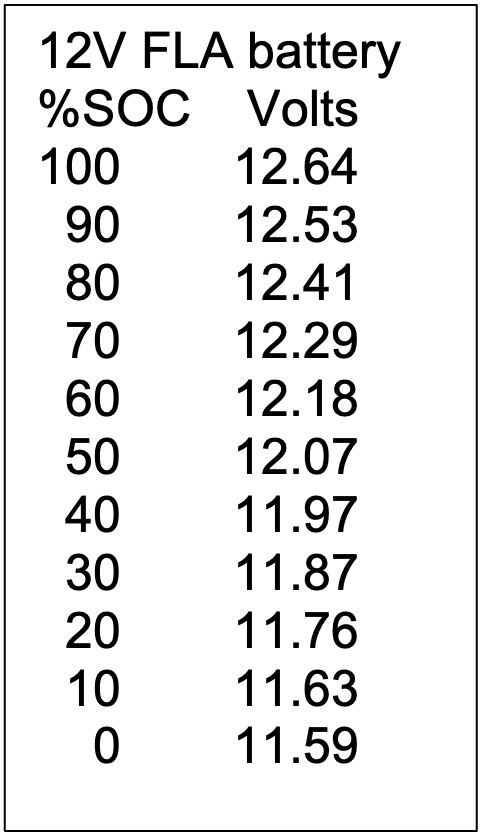
For standard FLA batteries, you shouldn’t discharge them below 50% as it shortens the life of the battery. VRLA sealed batteries such as AGM have approximately 0.2-volt higher readings.
Lithium Batteries are charged to 14.4 volts fully and show 10V at 0% charge. That is why you can’t just drop lithium in as a replacement for FLA batteries – they will never fully charge unless your charger has a lithium setting. Lithium batteries should not be charged below freezing. Their Battery Management Systems should prevent charging if too cold/ Many newer Lithium batteries have built in-heaters to keep them warm.
Battery charge indicators in most RVs are based on the voltage of the house battery which isn’t very accurate. If you plan to depend on your batteries and thus need a better way to monitor capacity, a smart battery monitor is a better choice. Such a device measures the current going into and out of the battery. A smart battery monitor connects between the battery (-) pole and ground (frame or black cable going to the frame). It knows when the battery is fully charged by monitoring the voltage and the current the battery charger is applying. It then tracks outgoing current as the battery is used and presents the state of charge in a display or on your phone. Most can compensate for the inefficiency of getting power in/out of a lead acid battery.
Charging Modes (magical incantations). Most battery chargers have three charging modes (or as few as 2 or as many as 9). When turned on, a battery charger goes into bulk mode, charging at a constant current while monitoring voltage. When the battery hits 80% capacity, the charger switches to an Absorption stage, suppling a constant voltage until current tails off (meaning battery is fully charged). Then it goes into a third stage: Float mode which simply tops off the battery to keep it from discharging. The charger will switch between these modes as needed as power is pulled from the battery.
Why Batteries Explode (and How to Prevent It)
Why do batteries explode? 12 V FLA batteries are comprised of 6 battery cells in series. Each cell has thin lead plates submerged in a water-sulfuric acid mix. Over the life of the battery, the plates can degrade, even fall apart. If a battery cell is overcharged, the water breaks down into oxygen and hydrogen fills empty spaces and vents out of the battery. If one cell is going bad or has an internal short as the plates break down, the normal charge voltage applied to the remaining 5 cells can overcharge them, breaking down more water into the explosive mix. The result is a one or more cells can be run dry and there can be a small spark between plates in the presence of a perfect oxygen and hydrogen mix and boom: you have an explosion. Usually, it is powerful enough to blow the top or side off the battery and splatters any remaining sulfuric acid in the battery all around. This is one reason for a good battery box – it helps contain the mess. If you find yourself in this situation, use baking soda to neutralize the acid (till it stops bubbling), wear protective gear and double bag the battery and contact your local battery recycler for any instructions to dispose of it not in the trash).
How can this be prevented? Checking the fluid level every couple of months is important. If one or more cells are showing fluid level lower than the rest, that could be an indication a cell is going bad. Also check the battery voltage when it should be fully charged, and disconnected from any power drain or charge from the RV. If the voltage is more than a couple of tenths below the 100% in the chart above, the battery may have a cell going bad. If it has been repeatedly run down well below 50% it may be time to replace it or at least have it load tested. Many auto parts will perform a free load test on a battery. They place a measured load on the battery and monitor the voltage to check its operation.
Tips for Testing While Everything Works
Now, when the electrical system in your RV is working would be a good time to get out your multimeter and check your batteries voltage while charging and when not. If you have an inverter, run some appliance and watch the battery voltage (it will drop) so you can compare for future troubleshooting. And don’t forget to check your connections for tightness and fluid levels in your led acid batteries. If you aren't sure how to use a multimeter, check out my other blog on multimeters.
Other blogs you might like...