From Confused to Confident: Learn to Read Your Multimeter Like a Pro

Michael Gardner • June 13, 2025

Multimeter Basics

If you’ve ever stared at a multimeter and wondered where to start. Or if you’ve ever stared at your RV battery and wondered whether it was “ok” or not, then read on. We will walk you through the terms and how to use a multimeter to measure them. Understanding the basic electrical terms and being able to use a multimeter are the first steps in diagnosing problems with your RV’s electrical system. 

Basic Electrical Terms

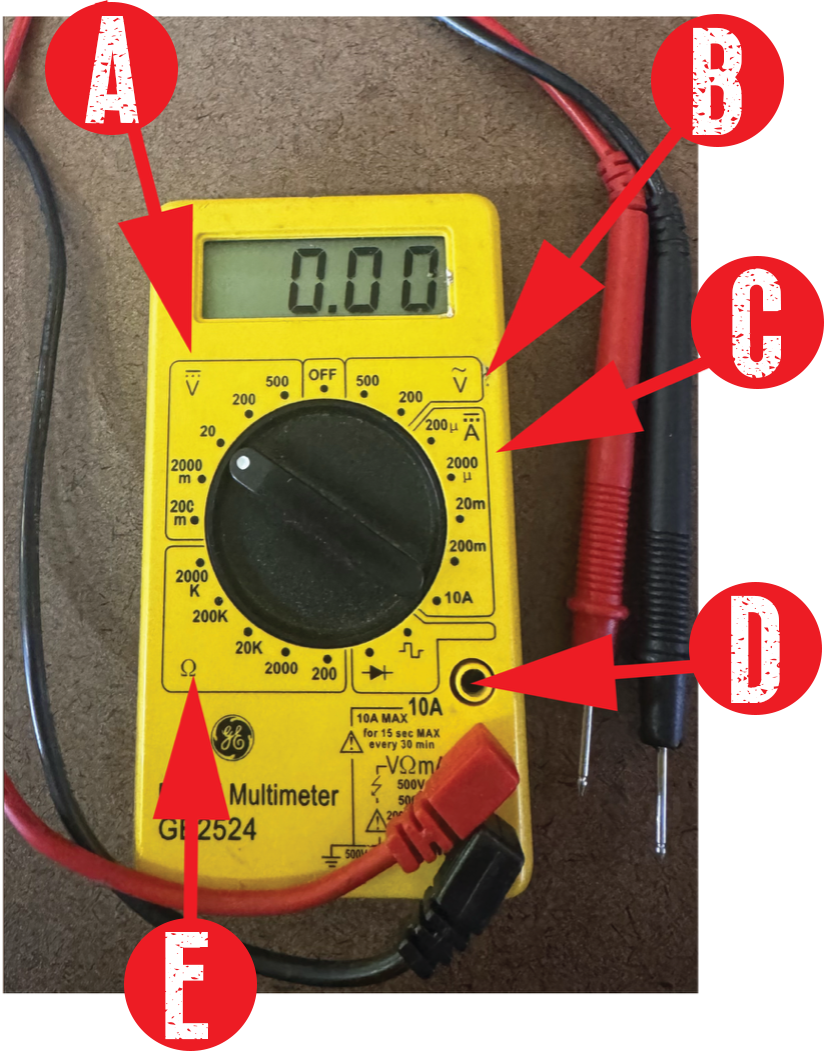
Volts are like pressure – water pressure. Even with the faucet closed, there is pressure in the pipe – like a battery.


Amps are a measure of current – which is electrons flowing like water in a hose.


Ohms are a measure of resistance – like pinching off the hose to slow the flow of water. The more resistance, the harder it is for current (electrons) to flow.
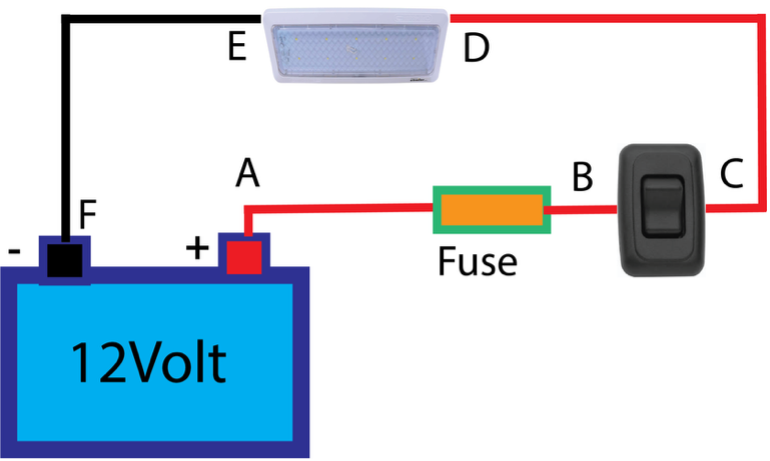

In a complete circuit, electrons need a continuous path to move through - like water flowing in a closed loop. If a wire is disconnected or a component is broken, that’s called an open circuit, and electricity can’t flow.


A short circuit, on the other hand, happens when a wire carrying voltage accidentally touches ground or another unintended path. This allows current to bypass the normal load, often leading to a blown fuse or burnt wire due to the sudden surge of current.


Direct Current (DC) is steady power such as from a battery.


Alternating Current (AC) is like what is supplied to your house, where the voltage alternates from plus to minus 60 times each second.


Without getting too complicated there is a relationship between voltage (V), current (I) and resistance (R).


In basic terms V = I x R.

Voltage = Current x Resistance


For example, if you have a 12-volt battery and a 5-ohm resistance in the circuit.

12 = I x 5 so 12/5 = I therefore I = 2.4, so the current is 2.4 amps.


There is one more term that is useful to be acquainted with power in Watts.

P = I x V. Most appliances list their Voltage, Current and Watts so you can calculate your total power usage or compare one product to another.

Let’s Take a Look at a Simple Multi-Meter.

It measures Volts, Ohms, and Amps.

A) Direct Current volts setting. Choose the setting that is next larger than what you expect to measure. For example, when looking at 12V DC circuits or batteries, use 20V setting

B) Alternating Current volts setting. for measuring 120V circuits, use 200V setting. For 240V circuit, use 500V setting. 


C) Current settings. Note all but the 10A setting are for very small currents – you are unlikely to encounter in your RV. 200m means 0.2 amps. For up to 10 amps, move the red lead to the 10A hole. IF you place the meter in a circuit that draws more than 10 amps, it will blow a fuse INSIDE the meter. Usually, it can be replaced.

D) Note, these lead ends are bare. Some meters come with slip on covers that only leave the very end open. If you are measuring high voltages, like 120 volts you need to be careful not to touch the bare leads while measuring.


E) These settings are for measuring resistance, in OHMS. The scale should be set to the highest resistance you expect to see. For fuses, 200 ohms scale is fine. Most things you will be looking at on the RV, that scale is all you need. If the measured resistance is higher (or infinite), this meter shows a “1” on the left side of the display with two spaces, no zeros before the decimal. Some meters blink when resistance is out of range (or there is no connection between the probes.) To be sure if the resistance is infinite, switch the meter to one higher OHM settings to see if the display remains the same.

Getting Started: A Simple Test

Grab a flashlight battery – AAA, AA, C, D etc. Set your meter to DC volts lowest setting greater than 1.5V. Place the red lead on the positive end and the black lead on the negative end. The meter should read 1.5 to 1.6 volts on a new alkaline battery. What if you hook the leads up backwards? The meter just reads -1.5 to -1.6 volts.

How to Test a Simple RV Circuit

Set meter to DC volts, place leads on A and F. It would read battery voltage of 12.3 or so. If it were significantly lower, (less than 12) then battery would need to be charged.


Place meter in OHMs 200 (or lowest setting), turn switch OFF and place leads on A and B. The meter should read a number close to zero – 0.1 or 0.0, meaning low resistance, which would show the fuse is good. 


SOME DC fuse panels place an LED in parallel with the fuse so that if the fuse is blown, the LED lights up. The fuse would be blown but if you want to test it, pull the fuse out and check it out of the circuit as the LED could confuse your reading.


If you believed the switch was bad, the best method to check is to disconnect at least one side, then use the meter OHM 200 setting and place the leads across the switch pins (B and C). Switch on should read 0 ohms. Switch off should read infinite ohms.


If everything up to there was good, that leaves the light and/or ground wire to be checked. Set the meter to DC volts and place leads on E and D, with fuse installed and switch on. Voltage should read the same as A to F – 12 volts. If there was battery voltage at D to E, and the light is off, then it has failed (bad bulb etc). The ground wire (E-F) likely doesn’t go back to the battery but to a common point in the fuse panel (or sometimes, just a wire to a screw into the frame) which is then connected to the battery. 


When checking an actual light, measuring voltages against the ground or negative side can get tricky as you are nowhere near the battery. The negative side of the battery should be connected to the RV frame so you could measure D on one probe and the other to the frame, but since most RVs are primarily wood and fiberglass it can be hard to find a true ground. Sometimes a long wire with alligator clips on each end to connect to a known point connected to the frame comes in useful. Your best bet would be connecting to the ground on the nearest working 12V device – another, but working, light etc.


As you can see, this can get a bit complicated but start simple; just checking in on your batteries.


One final note. All multi meters require an internal battery for the circuit to operate. This is usually a standard 9-volt (PP3) battery. Some meters have a battery door, but many require a screw or few to be removed to split the case. Batteries usually last for years of light use as long as you remember to turn the meter off when done.

Other Tests and Safety Gear

I’m not going to suggest you run out to your campground pedestal with your meter – there are just too many ways that can go wrong. There are however some tests you can do. You can buy an inexpensive circuit tester that plugs into 15- or 20-amp receptacles. They come with a built-in chart to interpret whether the pins have the right polarity and whether there Is a correct ground. This can also be quite useful diagnosing problems inside your RV. 

You can add to this a 30-to-15-amp adapter and use the same tester on RV 30-amp campground receptacle. Unfortunately, you can’t pull the same trick for 50 amp as a 50-to-30 adapter only passes one of the two circuits through the 50-to-30 adapter. It would in that case, test the line 1, neutral and ground pins.

Another device that can be useful is a Non-Contact Voltage Detector. Once turned on, any time the plastic tip is near a high voltage (>50V) the device will light up or buzz. It can tell you there is voltage on each of the line pins on a 50-amp receptacle without electrocuting you.

If all this is too confusing, one solution, my solution, was to install a power monitor that goes between the pedestal and my RV. These come in 30 or 50-amp models and can either be a unit you plug into the pedestal then plug your cord into or some models can be installed directly in the RV. They won’t allow power through to the RV unless all the pins have the right voltages. They will protect your appliances and air conditioners – disconnecting power if it drops too low or goes too high. They also have some lightning protection.

Start with one small test - like checking a flashlight battery and build your skills over time. Understanding your RV’s electrical system doesn’t have to be scary, and a multimeter is one of the best tools to build your confidence.

Other blogs you might like...

By Jennifer Schillaci September 12, 2025
Playing with Your Campground Crew: A Murbles Match for All Ages
By Ashley Wright September 11, 2025
Worries
By Jennifer+ Aggio September 10, 2025
If you’ve spent any time RVing, you already know you’re not the only one who thinks your rig looks cozy. Warmth, shelter, and even the tiniest crumb of food can turn an RV into a five-star resort for rodents. Mice, pack rats, and even the occasional chipmunk will happily move in if you give them half a chance. We’ve had three different rigs over the years—a travel trailer, a motorhome, and now a fifth wheel—and in each one, we’ve had to learn (sometimes the hard way) how to deal with critters. Show me an RVer who hasn’t had a run-in with a mouse, and I’ll show you someone who probably hasn’t camped long enough yet! What’s funny is how different rodents can be depending on where you are in the country. In some areas, mice are shy and easy to catch. In others, like southern Utah, they’re bold and fearless—practically daring you to try and stop them. Pack rats in the desert can be destructive little nest-builders, while in the Midwest you might just be dealing with your run-of-the-mill house mouse looking for warmth in the winter.  Over the years, we’ve learned a lot about keeping critters out (and sometimes getting them back out once they’re in!). Here’s our best advice for keeping your RV rodent-free—whether you’re putting it in storage or living in it full-time.
By Jennifer Schillaci September 9, 2025
Leaf Peeping: The Great American Autumn Obsession
By Michael Gardner September 5, 2025
February 2021
By Candice Dice September 4, 2025
Smart Devices for RVs: Convenience, Safety, and Peace of Mind on the Road
By Jennifer Aggio September 3, 2025
Find Your Basecamp: Campgrounds at Custer State Park
By Jennifer Schillaci September 2, 2025
Learn to RV Hershey Debut, Podcast Launch, Content Creator Connection, and a Big Thanks to RV Roofing Solutions
By Jennifer+ Aggio August 29, 2025
When you live in an RV, every pound matters. Between fuel efficiency, tow weight, and storage capacity, we’re always looking for ways to lighten the load without sacrificing comfort. Our shower was one of those overlooked places—until now. We recently swapped out our bulky glass shower door for the Stoett Nautilus Shower Door , and the difference has been nothing short of amazing!
By Alisha Deschene August 28, 2025
RV Living Isn’t a One Size Fits All
Show More