Inverters – When You Don’t Have Shore or Generator Power

Doug S • April 24, 2025

It’s common for new RVers to to be confused as to whether or not they will have “power” when they aren’t plugged in at a campsite. This confusion comes from the fact that there are 2 power systems in RVs:

  • 12v system runs off of the batteries ; 12v powers things like lights, water pump, bathroom vents, furnace control, slides, and electric stabilizers/leveling system
  • 120v system comes from the campsite power (or generator or inverters); 120v items are your regular outlets, microwave, air conditioners, residential refrigerators, most TVs, etc.

I’d like to extend a huge thank you to Kevin Skelton for his technical review of this article. I am good up until the details for complex setups. Check out their Never Stop Adventuring YouTube channel for great information.

Running 120v Off of Batteries

So what do you do when you want to be unplugged but still run various household appliances? You need to make 120v power!

Your options for making 120v power are to either fire up a generator or use an inverter to make the power from the batteries. The benefit of using an inverter over a generator is that inverters are silent and don’t use any fuel.

Battery Considerations
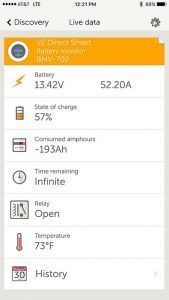
Screenshot from the Victron app showing battery state

Before we talk about inverter installation, you need to be mindful of what power is used from the battery/batteries. Batteries only store so much power. Depending on your types of batteries, you can use up to 50% of the rated charge for lead acid batteries and up to 100% with lithium batteries.

When you start using your batteries more and more, I strongly suggest you get a proper monitor like the Victron BMV to protect your batteries from too deep of a discharge as that can damage them.

Do Some Homework

Doing a little homework ahead of time is also a great plan. Technomadia has a good write up on doing an “energy audit“. Basically, use a Kill A Watt meter to measure the amount of power used by various devices. Doing this will help you determine what size inverter you need and how many batteries you need to get by.

Inverter Installation

Installing an inverter can be very simple to very complex. It basically comes down to what all do you want to power and how much convenience do you want ?

Simplest Installation – Plug Inverter into 12v Outlet

The first option is to get a small inverter (150 watts or less) and plug it into an existing round 12v outlet. This is a good option for powering a basic low-power appliance like a TV.

This does require that you have a round 12v plug already installed in the camper. Strangely, these are becoming fewer and further between these days. Both of my big 40’+ campers have only had 1.

To use it, you plug the inverter in and then the TV into the inverter.

Connect Inverter to Battery and Run Extension Cables

When installing an inverter, the size of the cables between the inverter and batteries are sized based on how big of an inverter you’re using (identified in watts) and the distance from the battery to the inverter. The higher the watts and/or longer the distance, the bigger the wires. You’ll often find that the wires to the round 12v plugs are very small and only support a small inverter.

To overcome that, you can install the inverter close to the battery and then run an extension cord to what you want to power. As we started Wallydocking, we found that I needed to run my CPAP/BiPAP machine , power our Sleep Number bed, and charge a variety of devices (phones, tablets, etc.). With all of these things, we would attach an inverter close to the batteries and then ran an extension cord into the window and then others to the various things we needed power. It felt a bit yucky with cords on the floor, but it did the job.

Connect Inverter to Battery and Plug the Camper Into it

The mess of cords was a hassle and as we got prepared for 2 weeks of boondocking at the Albuquerque Balloon Fiesta, I knew that it was going to drive us crazy. For that, I got the hairbrained idea to plug the whole camper into the inverter using a 50amp to 15amp adapter. I then ran my heavy duty extension cord to the inverter.
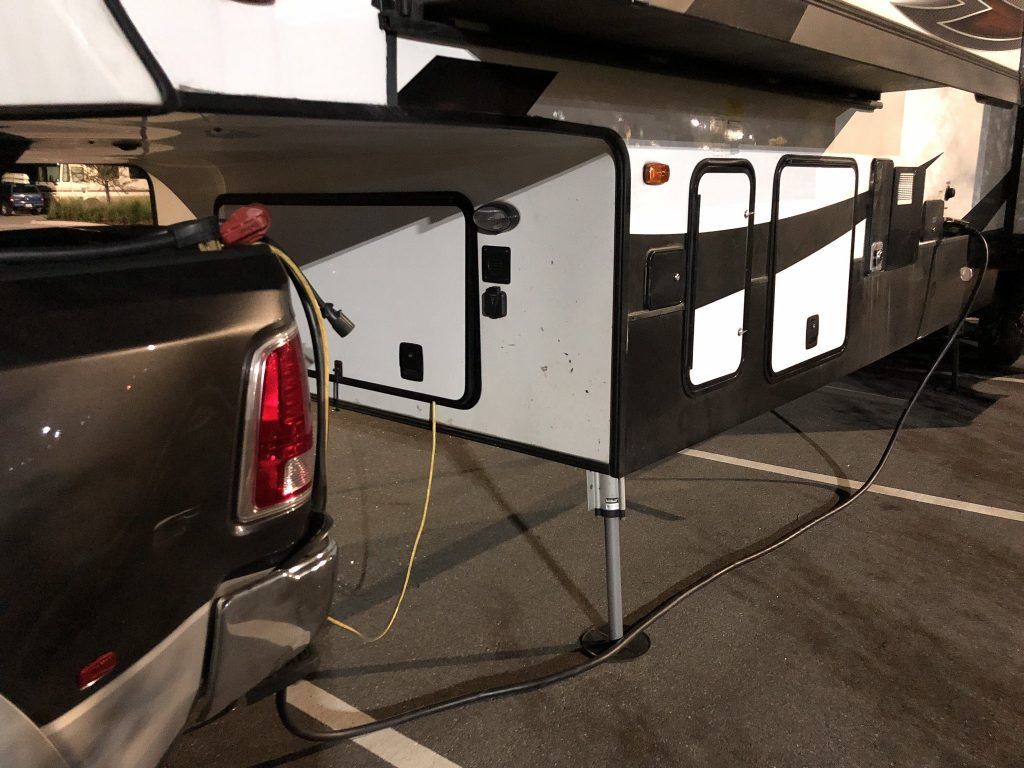
This works great, but you have to be careful and there are a few caveats to watch out for:

  1. You must turn OFF your battery charger (using the circuit breaker in the panel). If you’re lucky, it overloads the inverter and trips it; if you’re unlucky, it turns into a death spiral of the inverter/charger chewing up the batteries.
  2. It’s best to turn off all breakers except the ones for outlets that you plan on powering.
  3. You have to be very careful with how much power you use- either from the perspective of drawing down the batteries too quickly or overloading the inverter and tripping it.
    • Set your fridge to propane mode if you can
    • Water heater goes to propane mode
    • As mentioned, your air conditioner breaker should be off (it won’t work anyway)
    • Electric space heaters shouldn’t be used; use the gas furnace instead
    • Microwave and coffee makers need special consideration (larger inverter and plan on it using quite a bit of battery power)

This worked quite well for us, but it was a hassle during those 2-weeks at the Balloon Fiesta because switching between generator and inverter meant I had to go outside, switch the cords around, and turn circuit breakers on/off.

Transfer Switch for Specific Circuit Breakers

When the next Balloon Fiesta rolled around, we were in a different rig. This time, we had a built-in generator and I knew I didn’t want to muck with dealing with the power cord and turning breakers on/off.

This time I identified which circuit breakers that I wanted to be powered by the inverter. For me, there were 2: “GEN” (aka general) and “GFI” that powered almost all of the outlets in the RV.

I had already installed the inverter in the battery compartment and connected it to the batteries. I connected an extension cord to it and ran the cord through the underbelly of the RV to where my circuit breakers are.

I had a friend babysitting me and helping me, so we cut the “load” wires coming off of each circuit breaker to the outlets. We inserted a 15amp Xantrex Auto Transfer Switch by connecting the circuit breaker side of the wire to the “AC Input 1” on the switch and then the load side to the “AC Output” on the switch. You then connect the extension cord that runs from the inverter to the plug for “AC Input 2”. You’ll need one for each of the circuit breakers that you want to power.

The end result is that as if shore power is lost, the inverter automatically takes over powering that circuit breaker. There’s no thinking, no moving cords, it just works. Unfortunately, it’s not quite fast enough to keep the video game system and TV on… my son found that one out the hard way!

Automatic Transfer Switch for a Set of Breakers

The last option is the most complex option and that’s using an inverter with a built-in transfer switch. The benefit here is that it isn’t an extra piece of hardware that you have to install for each circuit breaker. This is generally used for larger 2000, 3000, or even 5000 watt inverters. Also, these inverters are usually battery chargers that are bigger and faster than the built-in battery charger (aka converter) that comes with your RV.

My favorite is the Victron Multiplus series of inverters. Fair warning, they’re expensive but Victron has been around for years in the marine business. They’re quality and they’re durable.
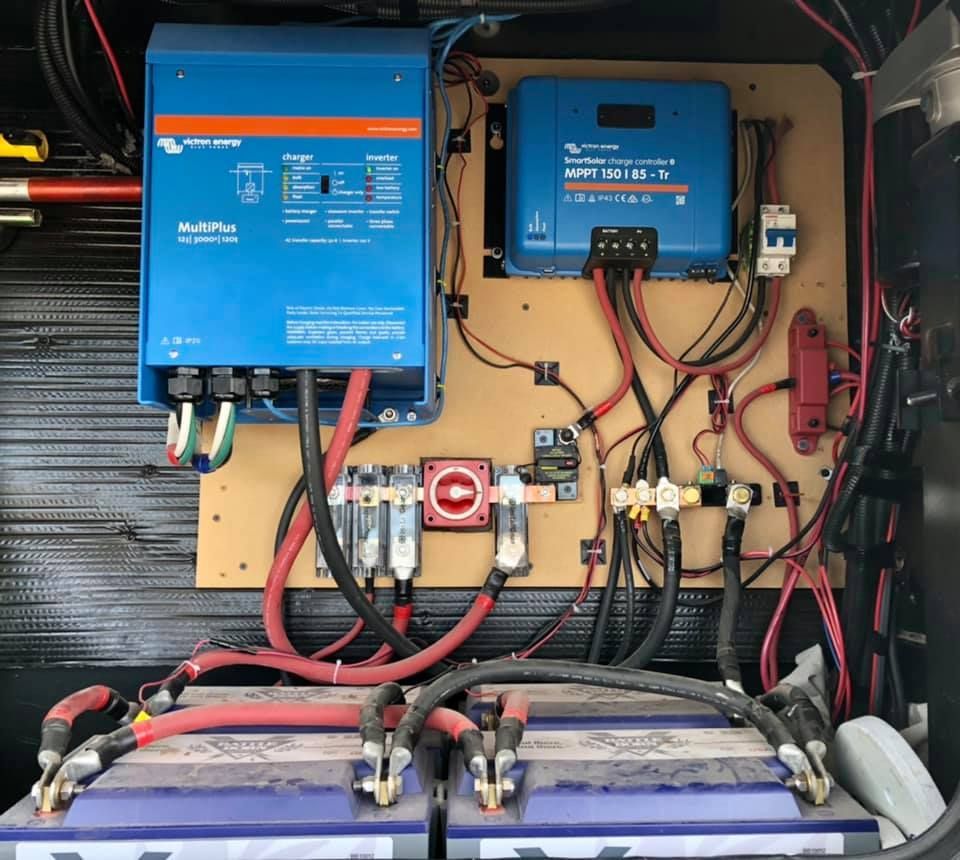
Battle Born batteries feeding a 3000 watt Victron inverter (with a Victron solar charger also shown); photo courtesy of Matt Thweatt

For 30amp rigs, it’s easier than 50amp rigs: you move the shore power input to feed directly to the inverter and then the inverter output goes to the circuit breaker panel.

For 50amp rigs, it’s a little more tricky due to 50amp service being 2 legs of 120v service that feed your RV and the inverters only automatically switch and output a single 120v phase. This means that you need to decide which outlets you’re going to invert and then move those breakers to a subpanel. You wire in the input for the inverter from the main panel and the output of the inverter to the subpanel.

And the installs just get more and more crazy advanced from here! I have friends who have a dozen lithium batteries, a pair of inverters, and 220v appliances that the inverters will upscale 30amp/120v service to provide power to everything. Don’t worry, some of that didn’t make full sense to me either!

So, if you want/need power when not plugged into shore power, there are options. From something as simple as plugging into an inverter, to upgrading all the things!


Other blogs you might like...

By Jennifer Schillaci October 21, 2025
Explore, Experiment, and Learn—Anywhere You Roam
By Jennifer Skinnell October 17, 2025
Washington D.C.
By Jennifer Schillaci October 16, 2025
From Towpaths to Timeless Tales—Explore the Erie Canal’s Living Story
By Jennifer+ Aggio October 15, 2025
Our Journey - From One Vehicle to Two
By Cathy Weaver October 14, 2025
A story of love, loss, lessons, and the road that still calls our name.
By Michael Gardner October 10, 2025
Phones - What Are They Good For
By Jennifer+ Aggio October 9, 2025
It's October, and if you're an RVer in a colder climate, you're facing one of the biggest decisions of the year: Do you winterize your rig and hunker down for the season, or do you pack up and chase the sun south? This isn't just about avoiding cold weather. It's about money, lifestyle, and a commitment that will shape your next 3-6 months. Get it wrong, and you could blow your budget, stress your family, or find yourself stuck somewhere that doesn't feel right. Get it right, and you'll discover why thousands of RVers make this migration every single year. I know many of you might be thinking it's too late to make this decision, and for many things you are right, but there are still options out there if you haven't made your decision yet, the key is being flexible. If you are full-timer either you move south where it is warmer or stay put and battle the cold. If you are a part timer then either you move south or figure out how to winterize your RV, see our guide to Winterizing your RV here . Why this decision matters more than you think: Financially: Southern migration isn't just about avoiding winterization costs. You're committing to 3-6 months of campground fees, fuel expenses, increased wear on your RV, and daily living costs in areas where prices may be higher than home. A poorly planned migration can cost $5,000-15,000+ more than winterizing and staying put. Lifestyle-wise: Spending winter down south means being away from family gatherings, missing grandkids' school events, potentially complicating work situations, and navigating healthcare needs far from your regular providers. It also means incredible experiences, new friendships, perfect weather, and the freedom to explore. Commitment-wise: Once you head south, turning around isn't simple. If you've booked three months at a campground and realize it's not working out, you're often locked in. If a family emergency happens back home, getting back quickly with an RV in tow is complicated and expensive. This guide isn't to scare you off from the idea but to prepare you so that should you choose to head south for the winter you can enjoy yourself! This guide is for you if: You're considering your first snowbird winter and don't know where to start You're working with a tight budget and need to know real costs, not fantasies You're weighing winterization versus migration and need concrete numbers You need to know when to book, where to go, and what mistakes to avoid Not sure if migration is right for you? Read our complete winterization guide first. It walks you through every step of proper winterization and helps you calculate the true costs of staying put versus migrating. Want to hear real stories about winter RVing? Check out our RV Winterization Podcast where Jennifer, Tasha, and I share their experiences with cold weather, southern migration strategies, and lessons learned the hard way. The truth is, there's no universal "right" answer. Some RVers thrive as snowbirds. Others prefer to stay close to home, winterize properly, and take shorter trips. The key is making an informed decision based on YOUR finances, YOUR family situation, and YOUR goals.
By Kirsten McCormick October 8, 2025
This is my absolute favorite picture from the teen camping trip this weekend because it captures such a sweet and important moment. Every time we do a Teen Connect Adventures camp at La Joyita, we partake in the canyon adventure on Saturday. It’s a hike/swim through a beautiful canyon of marbled purple and cream-colored rocks. Some portions can be hiked or climbed, and others require swimming through corridors of extremely cold spring water. Swim through a pool, climb up a cascade. Swim through a pool, climb up a cascade. Repeat. It’s challenging, and unless they are experienced climbers, it requires teamwork on the more difficult passages. Any teen who has completed the hike knows it’s a rite of passage. Many times, younger teens don’t complete it the first time they try and are eager to return the following season to give it another go. Depending on the season, sometimes the river is just a trickle outside of the seven pools of water you have to cross. Other times (like this one), rainy season increases the quantity and flow of the water, and there’s a lot more in the creek. This waterfall was particularly challenging to get up and down because the cascade was rushing over the rocks, making it impossible to see where to put your hands and feet. We had to feel under the water for good holds. In this shot, my son Connor (12) is being guided and supported by Justice (17). It truly captures my two favorite elements of the canyon hike: older teens stepping into leadership and supporting their younger peers, and younger teens trying things that scare them a little... building confidence while being encouraged by the whole group. We can teach our teens about leadership, courage, kindness, and responsibility, but teens (and all other human beings) learn best by doing, not by hearing, reading, or being told. We need to give them opportunities where the situation itself calls them into action. In these moments, they do and they learn simultaneously. They instinctively recognize that they are needed, and they step up. Nobody has to tell them. The feeling of satisfaction when they know they’ve made a difference teaches more than our words ever will. The same goes for the younger ones who are still building their confidence. Teens NEED to take healthy risks in order to grow. It’s something they have to FEEL in their bodies. You can’t learn confidence in any other way than by doing hard or risky things. This is what our teens need to combat anxiety and fear. And the cool thing is that it’s not even about succeeding or failing. When they try hard things... even if they don’t succeed the first time... they’re more equipped to try again and again than if they never tried at all. This photo was taken on the way back down the canyon. Climbing up wasn’t a problem, but climbing down was scary and Connor wasn’t sure he could do it. If they stop in those moments and don’t even try, they start telling themselves a story that they can’t do hard things. But with encouragement and support from an older teen... who first set the example, showed him how, and then offered a hand... he did what felt impossible. And THAT is the moment magic happens. These little successes help form identity and self-talk. And they don’t have to be big physical challenges like climbing waterfalls at camp (although that’s powerful). It’s the everyday opportunities teens need: taking the bus on their own, cooking a meal, starting a business, performing in public, finishing an art project, or teaching a younger kid how to do something. Our teens need more opportunities to do things rather than just consume information. Learning happens in the doing... in real life. These are the opportunities I try to give my kids as a mom and to the teens who come to our camps. It's intentional and never fails to take my breath away. You can learn more about our teen connect adventure camps here.
By Jennifer Schillaci October 7, 2025
Last year, we discovered that one of our kids wasn’t just gluten sensitive—they are truly gluten intolerant. That has shifted everything. Suddenly, our roadschooling rhythm, our cozy fall traditions, and our beloved holiday treats had to be reimagined. And let me tell you: learning the ins and outs of gluten-free living while traveling full-time in an RV is no small feat. Our teen was 17 when we discovered they needed to shift to a gluten-free lifestyle. Older. Wiser. You’d think that would make it easier to navigate. But in many ways, it made it harder. Seventeen years of favorites—comfort foods, family recipes, traditions—suddenly felt off-limits. And as an Italian family, that shift hit especially hard. Pasta nights, crusty bread with olive oil, holiday baking—all of it had to be reimagined. It wasn’t just about changing ingredients. It was about mourning the loss of what felt familiar, safe, and celebratory. Watching our teen navigate that grief with grace and resilience was humbling. We’ve since found new favorites, new rituals, and even gluten-free pasta that doesn’t taste like cardboard. But that transition wasn’t instant & often it was layered with strong emotions. Six Weeks In: The Cookie that Changed Everything Waking up six weeks into our gluten-free journey, we realized just how much had shifted. Our routines, our pantry, our mindset—it was all different. We were no longer just “trying” gluten-free. We were living it. And while the learning curve was steep, something unexpected happened that morning at a local farmers market. We found a cookie. Not just any cookie—a gluten-free cookie that tasted like a real cookie. Soft, warm, perfectly spiced. The kind of treat that wraps you in nostalgia and makes you forget, even for a moment, that anything was missing. Our kiddo took one bite and literally cried. Tears of joy, of relief, of recognition. Because in that moment, it wasn’t just about food—it was about belonging. About knowing that our family could still experience the magic of fall, the comfort of tradition, and the sweetness of the season… without compromise. That cookie reminded us that joy is still possible. That even in the midst of change, we can find new favorites, new rituals, and new reasons to celebrate. You’re Not Alone—We’re Cheering for You If you’re navigating this hurdle—whether it’s a new diagnosis, a tough travel day, or just trying to make gluten-free feel like home—please know: you’re not alone. We see you. We’ve been there. And we’re cheering for you every step of the way! Gluten-Free on the Go: Lessons from the Road RV life already demands flexibility. Add dietary restrictions, and you’re juggling a whole new set of logistics Cross-contamination concerns in tiny kitchens Limited pantry space for specialty flours and ingredients Finding safe options at roadside diners or campground potlucks Navigating grocery stores in unfamiliar towns We’ve had our share of missteps—like realizing halfway through a travel day that we didn’t pack any gluten-free snacks, or discovering that a “gluten-free” label didn’t mean safe for celiac. But we’ve also found joy in the challenge. It’s made us more intentional, more creative, and has made us more connected as a family. Hidden gluten is everywhere—and it’s sneaky. You’d be surprised how many everyday foods and condiments quietly contain wheat, barley, or rye. Soy sauce? Most brands use wheat unless specifically labeled gluten-free. Salad dressings and gravies often rely on wheat-based thickeners. Even ketchup, mustard, and barbecue sauce can contain malt vinegar or other gluten-derived additives. Deli meats, hot dogs, and pre-marinated proteins sometimes include gluten as fillers or flavor enhancers. Snacks—certain potato chips, candy bars, and even chewing gum can harbor hidden gluten. It’s not just about avoiding bread and pasta anymore; it’s about becoming a label-reading detective. When We Find a Good Gluten-Free Grocery Store… We Stock Up Like It’s the Apocalypse One of our golden rules on the road: never pass up a good gluten-free grocery store. When we stumble upon one—whether it’s a co-op in a small town or a well-stocked health food store—we go into full-on supply mode. Multiple bags of gluten-free flour blends (because you never know when inspiration—or a craving—will strike) Shelf-stable snacks for travel days: crackers, granola bars, and those elusive cookies that actually taste like cookies Specialty items we can’t find everywhere: tamari, gluten-free soy sauce, baking mixes, a favorite pasta brand and safe oats We’ve learned to treat these finds like treasure hunts. And when we hit the jackpot, we stock up like we’re preparing for a blizzard—even if it’s 75 degrees and sunny. It’s not just about convenience—it’s about peace of mind. Knowing we have safe, delicious options tucked away in our RV pantry means fewer compromises and more freedom to enjoy the journey. 
By Jennifer+ Aggio October 3, 2025
When Do You NEED to Winterize?
Show More